Running Postgres-BDR with Google Cloud Platform (2)

Running Postgres-BDR with Google Cloud Platform (2)

  • BDR을 위한 PostgreSQL 설정
  • postgresql.conf 설정
  • pg_hba.conf 설정
  • Postgres-BDR 설정
  • Database 만들기
  • 각 노드 구성

BDR을 위한 PostgreSQL 설정

postgresql.conf 설정

# 모든 서버 요청에 대해서 받을수 있게 설정
listen_addresses = '*'
# BDR 이 매개 변수는 쉼표로 구분 된 값 중 하나 BDR을 포함한다.매개 변수는 서버 기동시 변경 될 수 있습니다.
shared_preload_libraries = 'bdr'
# BDR 둘다 이 변수는 logical 을 세팅해야 함
wal_level = 'logical'
# BDR을 사용하기 위해서는 이 변수가 true 세팅 되어야 하며, UDR을 사용할 경우 false, 문서와 실제 파일이 안 맞음 on 으로 세팅
track_commit_timestamp = on
max_connections = 100
# 접속가능한 슬레이브의 접속수를 설정( 슬레이브 수 + 2)인거 같은데.. backup용 확실치 않음
max_wal_senders = 10
# 노드 + 1
max_replication_slots = 10
# BDR 구성 데이터베이스 당 하나의 작업자 및 연결 당 하나의 작업자을 가지고 충분히 큰 값으로 설정해야합니다.
max_worker_processes = 10

이 내용을 모두 반영하기위해 아래 내용을 스크립트로 만들어 sudo 명령어로 실행시키자. (ex. init_pgsql.sh)

#!/bin/bash
CONFIG=/etc/postgresql/9.4/main/postgresql.conf
#DATA=/var/lib/postgresql/9.4/main

sudo su -l postgres sh -c "sed -i -e \"s/#listen_addresses = 'localhost'/listen_addresses = '*'/g\" $CONFIG"
sudo su -l postgres sh -c "sed -i -e \"s/#shared_preload_libraries = ''/shared_preload_libraries = 'bdr'/g\" $CONFIG"
sudo su -l postgres sh -c "sed -i -e \"s/#wal_level = minimal/wal_level = 'logical'/g\" $CONFIG"
sudo su -l postgres sh -c "sed -i -e \"s/#track_commit_timestamp = off/track_commit_timestamp = on/g\" $CONFIG"
sudo su -l postgres sh -c "sed -i -e \"s/#max_wal_senders = 0/max_wal_senders = 10/g\" $CONFIG"
sudo su -l postgres sh -c "sed -i -e \"s/#max_replication_slots = 0/max_replication_slots = 10/g\" $CONFIG"
sudo su -l postgres sh -c "sed -i -e \"s/#max_worker_processes = 8/max_worker_processes = 10/g\" $CONFIG"
#sudo su -l postgres sh -c "sed -i -e \"s/#//g\" $CONFIG"

pg_hba.conf 설정

위 스크립트에 추가하여 함께 수행해도 된다.
마지막 추가된 행은 중간 IPv4 부분으로 복사하고 주석을 풀어줘야 로컬에서도 접속이 된다.

HBACONFIG=/etc/postgresql/9.4/main/pg_hba.conf
sudo su -l postgres sh -c "echo 'host all all 10.128.0.0/9 md5' >> $HBACONFIG"
sudo su -l postgres sh -c "echo '' >> $HBACONFIG"
sudo su -l postgres sh -c "echo '# The standby server must connect with a user that has replication privileges.' >> $HBACONFIG"
sudo su -l postgres sh -c "echo '# for BDR setting' >> $HBACONFIG"
sudo su -l postgres sh -c "echo 'host replication postgres 10.128.0.0/9 trust' >> $HBACONFIG"
sudo su -l postgres sh -c "echo '# 중간 IPv4부분을 아래와 같이 10.128.0.0/9 해 줘야 로컬에서도 접속이 됨' >> $HBACONFIG"
sudo su -l postgres sh -c "echo '#host all all 10.128.0.0/9 trust' >> $HBACONFIG"

PostgreSQL 시작/중지/재시작

  • 중지 : sudo service postgresql stop
  • 시작 : sudo service postgresql start
  • 재시작 : sudo service postgresql restart

Postgres-BDR 설정

Database 만들기

BDR 노드를 구성하기 전에 replication 할 database를 생성해야 한다.

$ sudo su - postgres
$ createdb testdb

각 노드 구성

  • Server Name : bdr-asia-1, bdr-asia-2, bdr-us-1, bdr-us-2, bdr-eu-1, bdr-eu-2
  • bdr-asia-1 을 1번 노드로 먼저 구성하고, 나머지를 하나씩 추가 한다.
  • 모든 작업은 해당 database 에 하나씩 connect 하여 실행해야 한다.
  • 확인하는 쿼리(bdr.bdr_node_join_wait_for_ready)를 이용한 확인에는 시간이 걸릴수도 있다. 모든 설정이 정상이라면 기다리면 결과가 나온다.
    만약 기다려도 답이 안올 경우, postgresql.conf 파일 중 max_wal_senders 와 max_replication_slots 값과 전체 노드 수가 맞는지 확인한다.
  • 모든 노드에 아래 순서대로 설정을 한다.
모든 서버에서의 설정
$ sudo su - postgres
$ psql
postgres=# \connect testdb
You are now connected to database "testdb" as user "postgres".

testdb=# CREATE EXTENSION btree_gist;
CREATE EXTENSION

testdb=# CREATE EXTENSION bdr;
CREATE EXTENSION
1. bdr-asia-1 서버에서의 설정

최초의 노드이므로 node_external_dsn 값만을 가지고 올라온다.

# 메인 노드 그룹 생성
testdb=# SELECT bdr.bdr_group_create(
local_node_name := 'asia-node-001',
node_external_dsn := 'host=bdr-asia-1 port=5432 dbname=testdb'
);
bdr_group_join
----------------

(1 row)

# 확인 하는 쿼리
testdb=# SELECT bdr.bdr_node_join_wait_for_ready();
bdr_node_join_wait_for_ready
------------------------------

(1 row)
2. bdr-asia-2 서버에서의 설정

bdr-asia-2 는 bdr-asia-1 로 join한다.

# 메인 그룹 참여
testdb=# SELECT bdr.bdr_group_join(
local_node_name := 'asia-node-002',
node_external_dsn := 'host=bdr-asia-2 port=5432 dbname=testdb',
join_using_dsn := 'host=bdr-asia-1 port=5432 dbname=testdb'
);
bdr_group_join
----------------

(1 row)

# 확인 하는 쿼리
testdb=# SELECT bdr.bdr_node_join_wait_for_ready();
bdr_node_join_wait_for_ready
------------------------------

(1 row)
3. bdr-us-1 서버에서의 설정

bdr-us-1 은 bdr-asia-1 로 join 한다.

# 메인 그룹 참여
testdb=# SELECT bdr.bdr_group_join(
local_node_name := 'us-node-001',
node_external_dsn := 'host=bdr-us-1 port=5432 dbname=testdb',
join_using_dsn := 'host=bdr-asia-1 port=5432 dbname=testdb'
);
bdr_group_join
----------------

(1 row)

# 확인 하는 쿼리
testdb=# SELECT bdr.bdr_node_join_wait_for_ready();
bdr_node_join_wait_for_ready
------------------------------

(1 row)
4. bdr-us-2 서버에서의 설정

bdr-us-2 는 bdr-us-1 로 join한다.

# 메인 그룹 참여
testdb=# SELECT bdr.bdr_group_join(
local_node_name := 'us-node-002',
node_external_dsn := 'host=bdr-us-2 port=5432 dbname=testdb',
join_using_dsn := 'host=bdr-us-1 port=5432 dbname=testdb'
);
bdr_group_join
----------------

(1 row)

# 확인 하는 쿼리
testdb=# SELECT bdr.bdr_node_join_wait_for_ready();
bdr_node_join_wait_for_ready
------------------------------

(1 row)
5. bdr-eu-1 서버에서의 설정

bdr-eu-1 은 asia-1 로 join 한다.

# 메인 그룹 참여
testdb=# SELECT bdr.bdr_group_join(
local_node_name := 'europe-node-001',
node_external_dsn := 'host=bdr-eu-1 port=5432 dbname=testdb',
join_using_dsn := 'host=bdr-asia-1 port=5432 dbname=testdb'
);
bdr_group_join
----------------

(1 row)

# 확인 하는 쿼리
testdb=# SELECT bdr.bdr_node_join_wait_for_ready();
bdr_node_join_wait_for_ready
------------------------------

(1 row)
6. bdr-eu-2 서버에서의 설정

bdr-eu-2는 bdr-eu-1로 join한다.

# 메인 그룹 참여
testdb=# SELECT bdr.bdr_group_join(
local_node_name := 'europe-node-003',
node_external_dsn := 'host=bdr-eu-2 port=5432 dbname=testdb',
join_using_dsn := 'host=bdr-eu-1 port=5432 dbname=testdb'
);
bdr_group_join
----------------

(1 row)

# 확인 하는 쿼리
testdb=# SELECT bdr.bdr_node_join_wait_for_ready();
bdr_node_join_wait_for_ready
------------------------------

(1 row)

To be continue …

Running Postgres-BDR with Google Cloud Platform(1)

Running Postgres-BDR with Google Cloud Platform (1)

  • 2ndQuadrant 란?
  • Postgres-BDR 사용에 최적의 환경을 제공해주는 Google Cloud Platform
  • Postgres-BDR 소개
  • Google Cloud Platform 에 인스턴스 생성
  • Postgres-BDR 설치
  • 초기화
  • 서비스 계정 추가

2ndQuadrant 란?

아마도 생소한 기업일거라 생각되어 간단히 소개 하겠다.
PostgreSQL 을 이용하여 기술 지원 사업을 하는 기업으로는 EDB(EnterpriseDB) 가 유명하다.
EDB는 EDB Postgre Advanced Server 라는 제품을 주력으로 하며 Oracle 제품과의 호환성을 장점으로 내세우고 있다.
EDB가 미국의 PostgreSQL 기술지원 기업이라면, 2ndQuadrant는 영국의 기업이다.
PostgreSQL에 대한 여러 책도 썼고, 기술지원, 교육, 개발, migration 과 컨설팅을 해주는 기업이다.

2ndQuadrant.com Homepage


Postgres-BDR 사용에 최적의 환경을 제공해주는 Google Cloud Platform

Cloud 서비스를 제공하는 업체는 한둘이 아니다. AWS, MS Azure, Google Cloud Platform(GCP), IBM 등 여러 업체들이 서비스를 제공하고 있다.

이 중에서 제가 사용해본 AWS 와 GCP 를 비교해본다면, AWS 의 서비스는 Region 중심으로 되어 있다.
만약 서울 region 에 DB 를 두고 Global 서비스를 하기 위해 미국, 유럽 등에 front 서버를 둔다면 Network latency 로 인해 서비스는 원활하지 않을 것이다.
미국 서비스를 위해 버지니아 region 에, 한국은 서울 region 에 셋팅하고, DB 동기화를 위해 연결시키려면 두 region 간의 VPN 터널을 열어줘야 한다.
각 Region 이 서로 다른 네트워크인 AWS 는 각 region 간의 서버들끼리 내부 망으로 연결이 안된다.
글로벌 서비스를 하기 위해 10개 region 을 셋팅했다면 이를 VPN 으로 모두 연결해줘야 하는데… ㅠㅠ;
생각만해도 너무 복잡하다.
(다른 해결 방법이 있다면 알려주세요.)

GCP는 어떨까?
AWS 와 마찬가지로 Region 이라는 개념이 있기는 하지만, 모든 Region 이 하나의 네트워크로 연결되어 있다.
모든 region 들의 서버가 하나의 네트워크에 존재하기에 그냥 ssh 로 연결하면 된다.

Postgres-BDR 은 48대까지 master 서버를 만들수 있는 것도 장점 중의 하나이고, Region 간의 latency 때문에 Delay 가 발생하기는 하지만, 수 초 내에 데이타 손실없이 제대로 동기화를 완료 해주었다.
하나의 Region 안에서는 매우 낮은 latency 를 보장해주기에 Raplicatoin 서버를 만들어도 빠른 데이타 복제가 가능한데, 다른 Region 으로의 데이타 복제는 높은 latency 로 인해 성능이 반토막 나기 일쑤였다.
Riak 이 그러했고, 테스트해봤던 Bucardo 의 경우에는 지속적인 데이타 인입에 대해 결국 동기화가 안되는 상황까지 발생했다.

현재 Region 간의 복제를 지원하는 솔루션은 몇 가지 안되는 걸로 알고 있다.
처음 BDR을 접했던 1년전에 비하면 지금은 많이 늘었는데, 혹시 더 있다면 알려주세요.

  • Couchbase
  • Cassandra
  • Crate
  • Postgres-BDR
  • Amazon RDS for MySQL (only Read replica)
  • Amazon Aurora (release 2016.6.1)

이 중에서 AWS 를 제외한 다른 Cloud 에서도 사용할 수 있으면서 RDBMS 이고, 클라우드 서비스를 사용하면서 벤더에 Lock-in 되는 것을 걱정하는 사람이라면 Postgres-BDR 외에 다른 대안은 없어 보인다.
GCP 에서는 복잡한 네트워크 작업을 할 필요 없이 그냥 인스턴스를 생성하고, Postgres-BDR 을 설치하고, 사용하면 Global 로 Multi-Region 간의 동기화가 되는 RDBMS를 사용할 수 있게 되기에 그야말로 최적의 환경이라 할 수 있다.


Postgres-BDR 소개

Bi-Directional Replication (BDR) 은 PostgreSQL 을 이용한 asynchronous multi-master replication system 이며, 특히 지리적으로 분산된 클러스터를 구성 할 수 있도록 설계되어 있다.
최대 48노드까지 Master로 사용할 수 있으며, 분산 데이터베이스에 대해 오버 헤드가 적게 걸리고 유지 보수 비용이 낮은 기술이다.

BDR_Basic_Schema3_display
[ 출처: 2ndquadrant.com) ]

BDR 과 다른 Open Source Replication Solutions 비교

아래 표를 보면 많은 기능을 지원하고 있다. 특히 DDL Replication 을 지원하고 있어서 모든 노드마다 작업을 해주지 않아도 된다는 장점이 있다.
다만, DDL 작업은 서비스에 영향을 미칠 수 있으니 항상 작업은 조심히 !

bdrfeaturematrix_display
[ 출처: 2ndquadrant.com) ]

안정성과 버그가 수정된 1.0 버전이 2016년 8월 12일에 릴리즈 되었다. 주요 특징은 다음과 같다.

  • Smoother handling of schema changes (DDL) statements allowing increased operational stability and reduced maintenance.
  • Various bug fixes for operational issues demonstrating high level of maturity
  • Performance tuning, especially of global sequence handling
  • Removal of the now deprecated UDR
  • Extensive documentation improvements based upon user feedback

전체 바뀐 내용은 BDR Release Note 를 참조하세요.


Google Cloud Platform 에 인스턴스 생성

  • region 별로 asia 2대, us 2대, europe 2대 씩 인스턴스를 생성한다.
    Server Name : bdr-asia-1, bdr-asia-2, bdr-us-1, bdr-us-2, bdr-eu-1, bdr-eu-2
# 아시아 인스턴스 생성
gcloud compute --project "" instances create "bdr-asia-1" --zone "asia-east1-c" \
--machine-type "n1-standard-4" \
--network "default" \
--maintenance-policy "MIGRATE" \
--scopes default="https://www.googleapis.com/auth/devstorage.read_only","https://www.googleapis.com/auth/logging.write","https://www.googleapis.com/auth/monitoring.write","https://www.googleapis.com/auth/servicecontrol","https://www.googleapis.com/auth/service.management.readonly" \
--image "/debian-cloud/debian-8-jessie-v20160803" \
--boot-disk-size "10" --boot-disk-type "pd-standard" \
--boot-disk-device-name "bdr-asia-1"

gcloud compute --project "" instances create "bdr-asia-2" --zone "asia-east1-c" \
--machine-type "n1-standard-4" \
--network "default" \
--maintenance-policy "MIGRATE" \
--scopes default="https://www.googleapis.com/auth/devstorage.read_only","https://www.googleapis.com/auth/logging.write","https://www.googleapis.com/auth/monitoring.write","https://www.googleapis.com/auth/servicecontrol","https://www.googleapis.com/auth/service.management.readonly" \
--image "/debian-cloud/debian-8-jessie-v20160803" \
--boot-disk-size "10" --boot-disk-type "pd-standard" \
--boot-disk-device-name "bdr-asia-2"

# 미국 인스턴스 생성
gcloud compute --project "" instances create "bdr-us-1" --zone "us-central1-c" \
--machine-type "n1-standard-4" \
--network "default" \
--maintenance-policy "MIGRATE" \
--scopes default="https://www.googleapis.com/auth/devstorage.read_only","https://www.googleapis.com/auth/logging.write","https://www.googleapis.com/auth/monitoring.write","https://www.googleapis.com/auth/servicecontrol","https://www.googleapis.com/auth/service.management.readonly" \
--image "/debian-cloud/debian-8-jessie-v20160803" \
--boot-disk-size "10" --boot-disk-type "pd-standard" \
--boot-disk-device-name "bdr-us-1"

gcloud compute --project "" instances create "bdr-us-2" --zone "us-central1-c" \
--machine-type "n1-standard-4" \
--network "default" \
--maintenance-policy "MIGRATE" \
--scopes default="https://www.googleapis.com/auth/devstorage.read_only","https://www.googleapis.com/auth/logging.write","https://www.googleapis.com/auth/monitoring.write","https://www.googleapis.com/auth/servicecontrol","https://www.googleapis.com/auth/service.management.readonly" \
--image "/debian-cloud/debian-8-jessie-v20160803" \
--boot-disk-size "10" --boot-disk-type "pd-standard" \
--boot-disk-device-name "bdr-us-2"

# 유럽 인스턴스 생성
gcloud compute --project "" instances create "bdr-eu-1" --zone "europe-west1-c" \
--machine-type "n1-standard-4" \
--network "default" \
--maintenance-policy "MIGRATE" \
--scopes default="https://www.googleapis.com/auth/devstorage.read_only","https://www.googleapis.com/auth/logging.write","https://www.googleapis.com/auth/monitoring.write","https://www.googleapis.com/auth/servicecontrol","https://www.googleapis.com/auth/service.management.readonly" \
--image "/debian-cloud/debian-8-jessie-v20160803" \
--boot-disk-size "10" --boot-disk-type "pd-standard" \
--boot-disk-device-name "bdr-eu-1"

gcloud compute --project "" instances create "bdr-eu-2" --zone "europe-west1-c" \
--machine-type "n1-standard-4" \
--network "default" \
--maintenance-policy "MIGRATE" \
--scopes default="https://www.googleapis.com/auth/devstorage.read_only","https://www.googleapis.com/auth/logging.write","https://www.googleapis.com/auth/monitoring.write","https://www.googleapis.com/auth/servicecontrol","https://www.googleapis.com/auth/service.management.readonly" \
--image "/debian-cloud/debian-8-jessie-v20160803" \
--boot-disk-size "10" --boot-disk-type "pd-standard" \
--boot-disk-device-name "bdr-eu-2"

Postgres-BDR 설치

Postgres-BDR 은 Fedora, CentOS, & RHEL 을 위해 yum 을 통한 RPMs 설치를 지원하고, Debian 과 Ubuntu 를 위해 apt 를 통한 DEBs 설치를 지원한다.
공식 설치 방법은 여기를 클릭.

패키지 설치

설치는 매우 쉽다.

sudo sh -c 'echo "deb [arch=amd64] http://packages.2ndquadrant.com/bdr/apt/ jessie-2ndquadrant main" >> /etc/apt/sources.list.d/2ndquadrant.list'
wget --quiet -O - http://packages.2ndquadrant.com/bdr/apt/AA7A6805.asc | sudo apt-key add -
sudo apt-get update
sudo apt-get -y install postgresql-bdr-9.4-bdr-plugin

Python 을 이용한 개발을 한다면 추가 패키지를 설치한다.

sudo apt-get -y install postgresql-bdr-plpython-9.4 postgresql-bdr-server-dev-9.4
  • BDR extension 이 반드시 설치되어야 한다. (package의 경우, postgresql-bdr-contrib)
  • pg_createcluster 를 이용해서 원하는 위치에 data directory를 생성할 수도 있다.

소스 다운로드

  • 패키지 설치를 원하지 않는다면 소스로도 설치할 수 있다. 방법은 알아서 ~~~

소스코드 GitHub

초기화 (선택사항)

테스트 하다가 PostgreSQL 에 문제가 있다고 생각되어 초기화를 하고자 한다면 다음 순서로 하면 된다.

sudo service postgresql stop
sudo rm -rf /var/lib/postgresql/9.4
sudo rm -rf /etc/postgresql/9.4/main
sudo rm -rf /service/db/pgsql/9.4/main
sudo chown -R postgres.postgres /var/lib/postgresql
sudo pg_createcluster -d /var/lib/postgresql/9.4/main 9.4 main
sudo service postgresql start

서비스 계정 추가 (선택사항)

상용 서비스용이라면 당연히 관리자 계정을 추가해줘야하는데, 여기선 테스트만 할 것이니 필요하다면 관리자 계정을 추가한다.

sudo su -l postgres sh -c "psql -dpostgres -c \"CREATE ROLE dbadmin LOGIN PASSWORD 'dbadmin1234' superuser;\""
  • Username : dbadmin
  • Password : dbadmin1234

To be continue…

[번역] New Google Cloud SSDs have AMAZING price to performance!


이 글은 Google Cloud Platform – Community 에 올라온 내용으로 부족한 영어 실력에 제멋대로 번역한 것임을 밝힙니다.

[ 원본 링크 : New Google Cloud SSDs have AMAZING price to performance! – Google Cloud Platform – Community – Medium ]


New Google Cloud SSDs have AMAZING price to performance!

Google Cloud 는 새로운 데이터베이스 관련하여 여러 기능을 발표했다. Datastore, BigTable, 그리고 Cloud SQL 2세대 서비스가 모두 베타에서 벗어났다!

이 중에서 정말 내 눈을 사로 잡은 것은 SSD Persistent Disks 가 거대한 IOPS boost 를 추가 비용없이 사용할 수 있다는 사실이었다! 25,000 IOPS에서, 기본적으로 중복 (redundancy) 기능이 내장되어 있고 초고속 백업 기능을 가지고 있는 네트워크에 연결된 디스크임을 잊어버리고 시작할 수 있다.

그래서 생각했다 : Google Cloud IOPS 를 AWS 와 Azure 와 같은 다른 클라우드와 비교하면 어떨까?

스포일러 : Google Cloud 는 나를 몹시 놀라게 했다!

비밀이야기 공개 : 나는 구글에서 일하기 때문에 강한 편견을 가지고 있지만, 가능한 한 공정하게 하려고 노력했다. 또한, 웹 사이트에 공개된 값을 사용했다. 어떠한 것도 성능테스트(벤치마킹)를 하지 않았다. 만약 당신이 AWS 또는 Azure 의 성능을 더 좋게 만들수 있거나 내가 뭔가 잘못하고 있다면 알려 주기 바란다!

AWS vs GCP

Amazon 의 EBS 볼륨은 종류가 다양하다. 그중 내가 찾는 것은 Provisioned IOPS SSD 일 것이다. 제공 할 수있는 최대 IOPS 는 볼륨 당 20,000 이다.

Google Cloud Persistent Disk 를 사용하면, 볼륨 당 25,000 IOPS를 얻을 수 있다. 단지 IOPS 가 할당되기 위해 충분한 CPU 와 Disk 용량을 확인하기만 하면 사용할 수 있다.

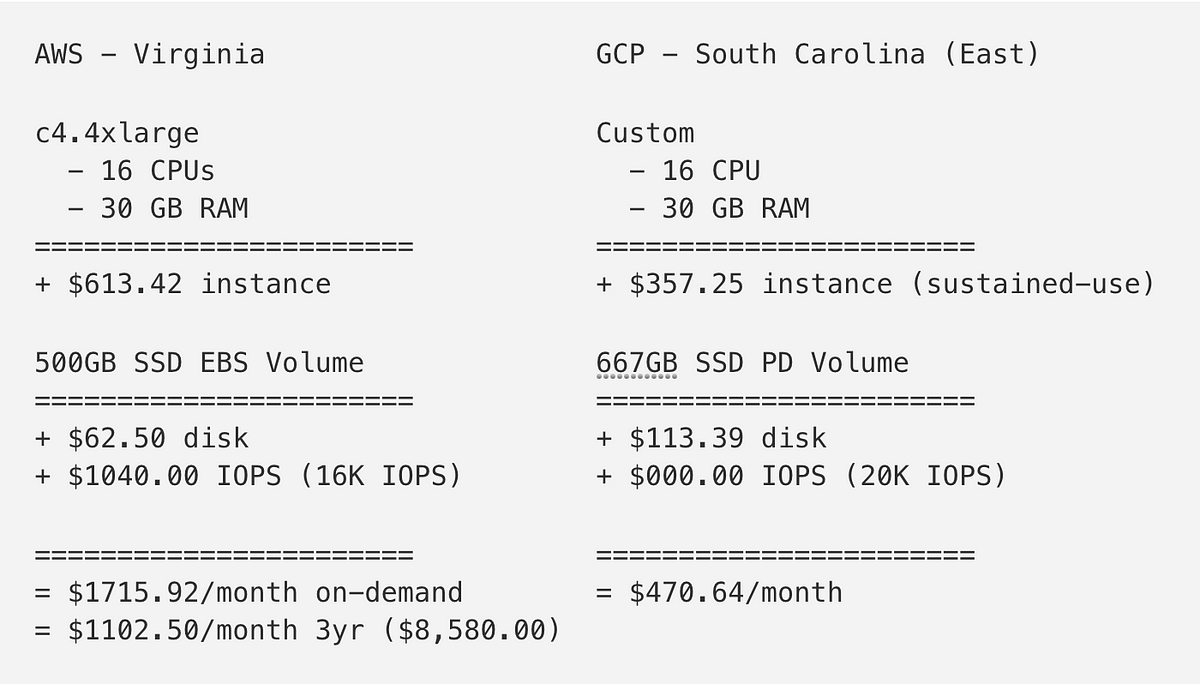
그럼 몇 가지 비교를 해보자. 디스크 용량 500 기가바이트를 가진 데이터베이스 서버를 원한다면 :

AWSvsGCP-1

Wow. Just Wow.

1/3 비용으로 IOPS 를 확보했다 !

AWS 에서 하나의 인스턴스 금액으로 Google Cloud 에서 세 개의 인스턴스를 실행할 수 있다.

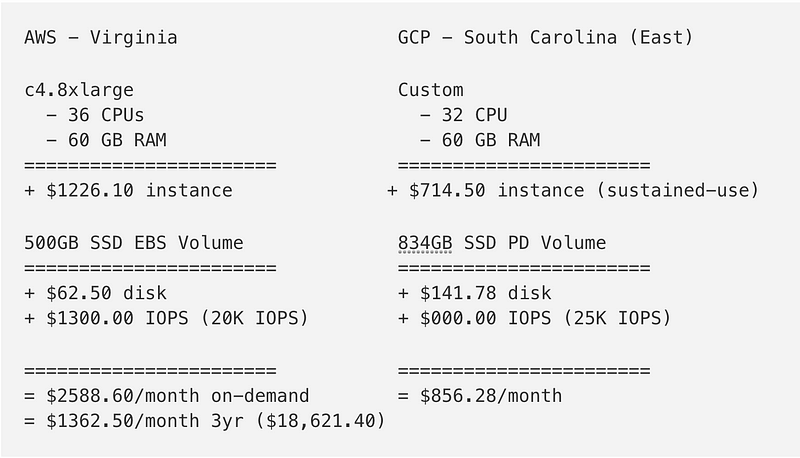
자 이제 각 공급사의 최대 IOPS 를 설정해보자.

AWSvsGCP-2

Again!

1/3 비용으로 IOPS 를 확보했다 !

AWS 에서 4개 이상의 CPU core 를 가진 인스턴스를 사용한다면, Google Cloud 에서는 32 core 시스템을 3대 사용할 수 있다.

선불로 $18,000 을 지불하더라도, AWS 는 여전히 많이 비싸다! 그건 미친 짓이다!

왜 Google Cloud 는 그렇게 싼가 ?

두 가지 이유가 있다:

  1. GCP의 인스턴스 비용이 저렴하다. 지속적인 사용에 대해 자동으로 적용되는 할인이 없더라도, Compute Engine 은 보통의 EC2 보다 싸다.
  2. AWS 의 Provisioned IOPS 는 매우 비싸다. Google Cloud 에서 디스크는 디스크 용량에 따라 자동으로 프로비저닝 된 IOPS 를 얻을 수 있다. 목표한 IOPS 를 얻기 위해 과도하게 디스크 용량을 할당했던 이유이다. 그럼에도 불구하고 AWS 는 IOPS 를 위해 추가 비용을 지불하게 만들고, 그것을 볼 수 있었다!

EDIT: GCP 에서보다 작은 인스턴스에 Provisioned IOPS EBS 볼륨을 붙힐 수 있다는 것을 지적했다. @fittedcloudt2.small 인스턴스에 20K IOPS 디스크를 장착 하고, 전체 디스크 성능을 얻었다. 이는 한 달에 $1,381.54 를 지불했고, 인스턴스는 오직 1 CPU 와 2 GB RAM 을 사용했다. 다시 말하지만, 이것은 provisioned IOPS 때문이고 매우 비싸다!

Azure vs GCP

Azure 의 각 인스턴스는 디스크가 있지만, 이것은 인스턴스가 지워지거나 이동되면 삭제되는 임시 디스크이다. 대신, AWS 와 GCP 가 제공해주는 네트워크에 연결된 persistent 디스크와 같은 유형의 스토리지를 원한다면 Premium SSD 스토리지를 사용해야 한다.

Premium SSD 스토리지의 재미있는 점은 미리 설정된 덩어리 형태로 제공한다는 것이다. AWS 또는 GCP 와는 다르게, 당신이 원하는만큼의 IOPS 나 디스크 용량을 정확히 지정할 수 없다. 이것은 또한 GCP 와 AWS 가 제공하는 것과 같은 레벨의 IOPS 를 얻기 위해 RAID 에 디스크를 스트라이프 해야만 한다는 것을 의미하고, 이것은 엄청난 고민 거리가 될 것이다. 인스턴스에서 이것을 설정하기 위해 무엇을 어떻게 해야하는지 복잡해진다.

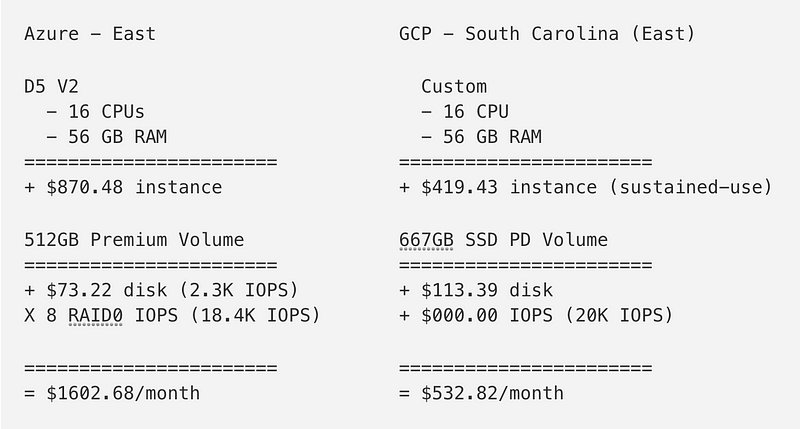
말했던 것들에 대해서, 가격을 살펴보자:

AWSvsGCP-3

Again!

1/3 비용으로 IOPS 를 확보했다 !

나는 여기에서 트렌드를 보고 있다고 생각한다.

Azure 의 비용에서, 이것은 앞 섹션에서 설정했던 AWS 인스턴스보다 빠르고 저렴함을 알 수 있다. 그러나 Google Cloud 의 가격은 너무 낮다. 미쳤다!

왜 Google Cloud 는 그렇게 싼가 ?

두 가지 이유가 있다:

  1. GCP의 인스턴스 비용이 저렴하다. 지속적인 사용에 대해 자동으로 적용되는 할인이 없더라도, Compute Engine 은 보통의 Azure VM 보다 싸다.
  2. Azure 에서 IOPS 를 얻는 방법은 구식이다. Azure 는 원하는 IOPS 성능을 얻기 위해 여러개의 디스크를 함께 묶어서 만들어야 한다. 이는 비슷한 성능을 얻기 위해 8개 볼륨을 함께 묶어야 (stripe) 함을 의미한다. Google Cloud 를 사용하면, 자동으로 IOPS 를 확보할 수 있다. 볼륨을 묶어서 (stripe) 할 이유가 없다 ( 참고로 정말 어쨌든 GCP 에 도움이되지 않는다 ).

결론

나는 미친 약을 먹고 있는 것 같은 느낌이다. Google Cloud 는 동일하거나 더 나은 IOPS 성능을 AWS 와 Azure 보다 1/3 의 비용에 제공하고 있다!

나는 AWS 또는 Azure 의 전문가가 아니다. 만약 이러한 플랫폼에서 더 나은 시스템을 구성할 수 있다면, 코멘트를 달아 알려주세요.

또한 GCP 도 완벽하지 않다. 최대 인스턴스 당 Persistent Disk IOPS 가 25k 이다. AWS 와 Azure 의 어떤 (매우 비싼) 인스턴스는 더 나은 성능이 나올 수도 있다.