글쓴이 : 윤성재 (공작명왕)
E-mail , Facebook
Overview
Stackdriver에 대한 내용과 설치 방법은 Stackdriver Monitoring Documentation을 참조하기 바란다.
여기에서는 Stackdriver Agent가 설치되어 Monitoring 이 되고 있는 인스턴스에 설치된 Third-party Application 에 대한 추가 설정에 대해 설명하도록 하겠다.
준비할 것
당연하겠지만 구글 콘솔에 접속할 수 있는 브라우저가 있는 개인 PC
GCP(Google Cloud Platform) 을 사용할 수 있는 Account
GCP에 생성된 Project. 만약 없다면 처음 사용자를 위한 준비를 따라하도록 한다.
개인 신용카드 (본인 확인을 위해 $1.00이 승인되나 청구되지는 않는다.)
모니터링을 위한 GCP 준비
우선 프로젝트를 만들고 빌링계정을 생성하자.
New project 생성 : stacktest
빌링 계정 생성 : 신용카드를 등록해준다.
처음 GCP에 가입하면 60일동안 테스트 용으로 사용하라고 $300 크레딧을 무료로 넣어준다.
이는 프로젝트를 생성하고 들어가면 Billing 메뉴에서 확인할 수 있다.

[ 출처: Flickr, gongjak1 ]
테스트 인스턴스 생성
이제 모니터링을 위한 인스턴스를 생성하자.
GCP 콘솔 -> Compute Engine -> VM instance -> CREATE INSTANCE
test-stackdriver-001
- Name : test-stackdriver-001
- Zone : asia-east1-a
- Machine type : 1 vCPU , 3.75 GB memory
- Boot disk : Debian GNU/Linux 8 (jessie)
- 나머지는 모두 default
test-stackdriver-002
- Name : test-stackdriver-002
- Zone : asia-east1-a
- Machine type : 1 vCPU , 3.75 GB memory
- Boot disk : CentOS 7
- 나머지는 모두 default
GCP에서 권고하는 Debian Linux 와 많은 사람들이 사용하는 CentOS 7을 기준으로 설명하도록 하겠다.
Stackdriver Agent 설치
잠시 기다린 후에 인스턴스 생성이 완료 되면 SSH로 접속하여 stackdriver agent를 설치하도록 한다. 설치 방법은 OS에 상관없이 동일하다. (https://cloud.google.com/monitoring/agent/install-agent)
$ curl -O "https://repo.stackdriver.com/stack-install.sh"
$ sudo bash stack-install.sh --write-gcm
Stackdriver Monitoring 초기 설정
이제 Monitoring에 제대로 나오는지 확인해보자.
GCP 콘솔 -> Monitoring
Login with google 이라고 나오면 Google ID로 로그인하면 된다.
이 후는 아래 그림을 보면서 진행한다.
Create a new Stackdriver account 를 선택하고 Continue 클릭.

[ 출처: Flickr, gongjak1 ]
stacktest 를 선택하고 Create Account 클릭.

[ 출처: Flickr, gongjak1 ]
더 추가할 프로젝트는 없으므로 Continue 클릭.
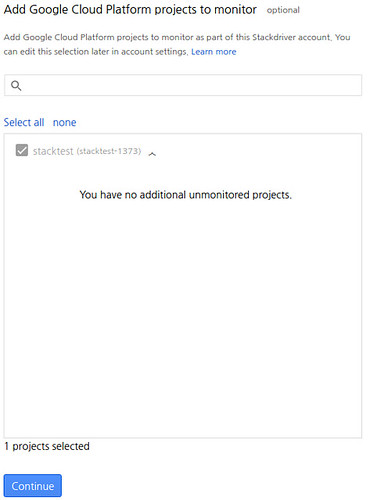
[ 출처: Flickr, gongjak1 ]
AWS 계정은 생략하고 Done 클릭.
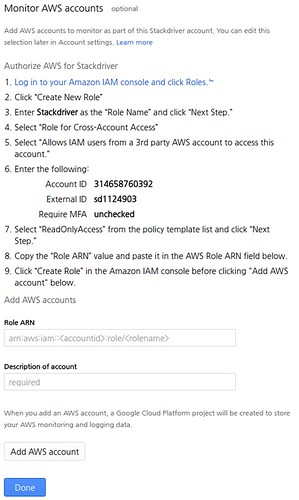
[ 출처: Flickr, gongjak1 ]
잠시 기다리면 다음과 같이 완료되었다고 나온다.
‘Launch monitoring’을 클릭하여 모니터링을 시작해보자.

[ 출처: Flickr, gongjak1 ]
모니터링 리포트를 날마다 받을지, 주마다 받을지 안받을지를 정하면 된다.
여기서는 테스트만 할 것이기에 ‘No reports’를 선택.
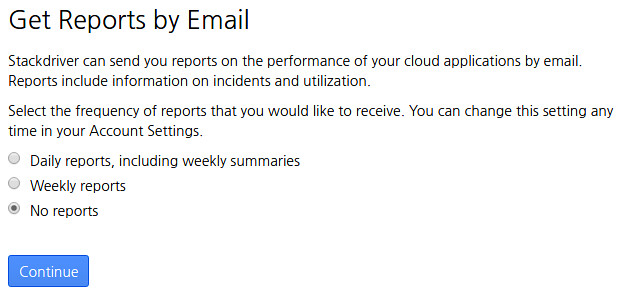
[ 출처: Flickr, gongjak1 ]
모니터링 화면이 나오면 인스턴스가 제대로 등록되었는지 확인해본다.
Stackdriver Monitoring -> Resource -> Instances
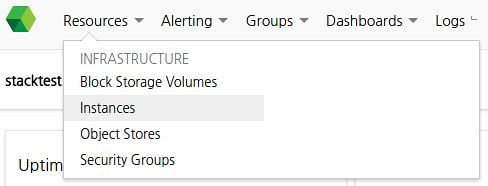
[ 출처: Flickr, gongjak1 ]
다음과 같이 생성한 인스턴스 2개가 모두 나오는지 확인해본다.

[ 출처: Flickr, gongjak1 ]
인스턴스 Name을 클릭하여 시스템 기본 정보를 잘 수집해 오는지도 확인해보자.
Agent가 수집하여 화면에 그래프로 보여주는 기본 정보는 다음과 같다.
- CPU Usage
- CPU Load
- CPU Steal
- Memory Usage
- Disk Usage
- Disk I/O
- Network Traffic
- Open TCP Connections
- Processes
Monitoring Group 생성
Stackdriver Monitoring -> Groups -> Create…

[ 출처: Flickr, gongjak1 ]
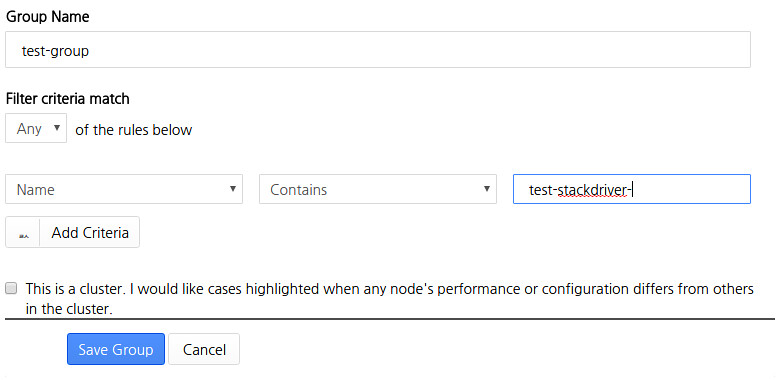
화면이 나오면 다음과 같이 생성하자.
‘test-stackdriver-’를 포함하는 인스턴스들을 이 그룹에 포함하겠다는 의미이다.
즉, “test-stackdriver-003”을 추가로 생성하고, agent를 설치하면 자동으로 이 그룹에 포함되게 된다.
- Group Name : test-group
- Filter criteria match : Any
- Name
- Contains
- test-stackdriver-
[ 출처: Flickr, gongjak1 ]
그룹을 생성하게 되면 보여지는 그래프도 조금은 바뀌게 된다.
KEY METRICS
- Instance (GCE) – CPU (agent)
- Block Storage Volumes – Total Volume Capacity
- Block Storage Volumes – Total volumes
RUNNING RESOURCES
- Running Instances
의미는 어렵지 않으니 설명하지 않도록 하겠다. KEY METRICS는 필요하다면 챠트를 더 추가할 수도 있다.
이제 Stackdriver agent에 plugin을 설치하여 모니터링을 추가해보도록 하자.
모니터링 가능한 Thrid-party Application 목록
추가 가능한 plugin 목록이다. 가장 많이 사용하는 Application 들을 중심으로 실제 설치하고 셋팅하면서 Stackdriver Monitoring에 어떻게 보여지는지 확인해 보도록 하겠다.
(https://cloud.google.com/monitoring/agent/plugins/)
- Apache web server
- Cassandra
- CouchDB
- Elasticsearch
- HBase
- JVM Monitoring
- Kafka
- Memcached
- MongoDB
- MySQL
- Nginx
- PostgreSQL
- RabbitMQ
- Redis
- Riak
- Tomcat
- Varnish
- ZooKeeper
Apache Httpd Plugin
1.Apache Httpd 설치와 시작
< Debian 8 >
$ sudo apt-get install apache2
$ sudo service apache2 start
$ sudo service apache2 status
< CentOS 7 >
$ sudo yum install httpd
$ sudo systemctl start httpd
$ sudo systemctl status httpd
웹서버로 직접 접속하여 확인하고자 한다면 방화벽을 열어줘야만 한다.
GCP 콘솔 -> Compute Engine -> VM instance -> 인스턴스 클릭 -> EDIT -> Firewalls -> Allow HTTP traffic 클릭 -> Save
이제 각 인스턴스의 “External IP”로 웹서버에 접속할 수 있다.
2.사전 준비
Apache plugin 중에 mod_status 가 설치되어 있는지 확인한다.
$ curl http://localhost:80/server-status?auto

[ 출처: Flickr, gongjak1 ]
< Debian 8 >
GCP 에서는 status.conf 가 기본으로 설치되므로 잘 된다.
< CentOS 7 >
server-status 가 없어서 404 Not Found 가 나온다. server-status 를 설치해주자.
$ cd /etc/httpd/conf.d/ && sudo curl -O https://raw.githubusercontent.com/Stackdriver/stackdriver-agent-service-configs/master/etc/httpd/conf.d/status.conf
$ sudo sed -i s/127.0.0.1:/localhost:/g /etc/httpd/conf.d/status.conf
$ sudo sed -i s/127.0.0.1/"127.0.0.1 localhost"/g /etc/httpd/conf.d/status.conf
$ sudo su -c "echo 'LoadModule status_module modules/mod_status.so' > /etc/httpd/conf.modules.d/00-status.conf"
$ sudo systemctl restart httpd
3.plugin 설치
$ cd /opt/stackdriver/collectd/etc/collectd.d/ && sudo curl -O https://raw.githubusercontent.com/Stackdriver/stackdriver-agent-service-configs/master/etc/collectd.d/apache.conf
4.Stackdriver Agent 재시작
< Debian 8 >
$ sudo service stackdriver-agent restart
< CentOS 7 >
$ sudo systemctl restart stackdriver-agent
5.Monitoring 확인
Monitoring -> Resources -> Instances
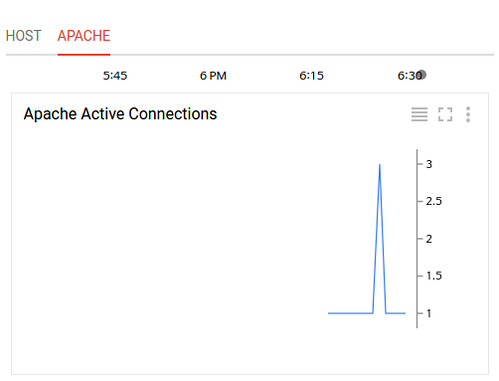
각 서버를 클릭해보자. stackdriver agent가 plugin이 정상으로 동작하여 정보를 제대로 가져온다면 Monitoring의 오른쪽 그래프 윗부분에서 다음과 같은 화면을 볼 수 있다.
[ 출처: Flickr, gongjak1 ]
6.현재 모니터링이 가능한 항목
- Active Connections (count): The number of active connections currently attached to Apache.
- Idle Workers (count): The number of idle workers currently attached to Apache.
- Requests (count/s): The number of requests per second serviced by Apache.
- Scoreboard
- Traffic
Cassandra Plugin
1.Cassandra 설치와 시작
< Debian 8 >
$ sudo sh -c "echo 'deb http://www.apache.org/dist/cassandra/debian 37x main' > /etc/apt/sources.list.d/cassandra.list"
$ sudo sh -c "echo 'deb-src http://www.apache.org/dist/cassandra/debian 37x main' >> /etc/apt/sources.list.d/cassandra.list"
$ gpg --keyserver pgp.mit.edu --recv-keys 749D6EEC0353B12C
$ gpg --export --armor 749D6EEC0353B12C | sudo apt-key add -
$ sudo apt-get update
$ sudo apt-get install cassandra
$ sudo service cassandra start
참조 : http://wiki.apache.org/cassandra/DebianPackaging
< CentOS 7 >
cassandra 3.x Repository 를 추가해준다.
/etc/yum.repos.d/datastax.repo:
[datastax-ddc]
name = DataStax Repo for Apache Cassandra
baseurl = http://rpm.datastax.com/datastax-ddc/3.7
enabled = 1
gpgcheck = 0
설치하고 시작해준다.
$ sudo yum install java-1.8.0-openjdk datastax-ddc
$ sudo /etc/init.d/cassandra start
참조 : http://docs.datastax.com/en/cassandra/3.x/cassandra/install/installRHEL.html
2.사전 준비
노드가 정상 작동중인지 확인한다.
$ nodetool status

[ 출처: Flickr, gongjak1 ]
Cassandra 는 JMX 를 통해서 모니터링을 하기에, Cassandra에 JMX 설정이 되어야만 하는데, 다행히 localhost 호스트에서의 JMX 설정은 되어 있는 상태이며 기본 포트는 7199이므로 다음 명령어로 확인할 수 있다.
$ netstat -na| grep 7199

[ 출처: Flickr, gongjak1 ]
3.Plugin 설치
$ cd /opt/stackdriver/collectd/etc/collectd.d/ && sudo curl -O https://raw.githubusercontent.com/Stackdriver/stackdriver-agent-service-configs/master/etc/collectd.d/cassandra-22.conf
4.Stackdriver Agent 재시작
< Debian 8 >
$ sudo service stackdriver-agent restart
< CentOS 7 >
$ sudo systemctl restart stackdriver-agent
5.Monitoring 확인
Monitoring -> Resources -> Instances
각 서버를 클릭해보자. stackdriver agent가 plugin이 정상으로 동작하여 정보를 제대로 가져온다면 Monitoring의 오른쪽 그래프 윗부분에서 다음과 같은 화면을 볼 수 있다.

[ 출처: Flickr, gongjak1 ]
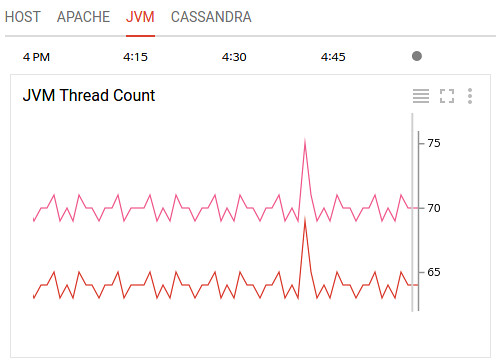
Cassandra는 JVM 기반으로 동작하기에 친절한 Stackdriver는 JVM 모니터링까지 함께 할 수 있게 자료를 수집해서 보여준다.
[ 출처: Flickr, gongjak1 ]
6.현재 모니터링 가능한 항목
JVM
- Active JVM Threads
- JVM Heap memory usage
- JVM Non-Heap memory usage
- JVM Open File Descriptors
- JVM Garbage Collection Count
Cassandra
- Storage Load: The amount of data stored on each Cassandra node.
- Pending Tasks: The number of basic task stages waiting to run.
- Active Tasks: The number of basic task stages currently running.
- Blocked Tasks: The number of basic task stages blocked from running.
- Pending Internal Tasks: The number of internal task stages waiting to run.
- Active Internal Tasks: The number of internal task stages currently running.
- Cassandra Pending Compactions
- Cassandra Pending CommitLog
MongoDB Plugin
1.MongoDB 설치와 시작
< Debian 8 >
$ sudo apt-get install mongodb
< CentOS 7 >
$ sudo yum install mongodb-server mongodb
$ sudo systemctl start mongod
2.사전 준비
모니터링을 위해 clusterMonitor Role를 가진 유저를 admin database에 생성해준다. db.auth 명령어에서 “1”이 나오면 정상으로 인증에 성공한 것이다.
< Debian 8 >
$ mongo
> use admin
> show users;
> db.addUser("stackuser","stack1234","clusterMonitor");
> db.auth("stackuser","stack1234");
1
> exit
< CentOS 7 >
$ mongo
> use admin
> show users;
> db.createUser( { user: "stackuser", pwd: "stack1234", roles: ["clusterMonitor"] } )
> db.auth("stackuser","stack1234");
1
> exit
3.Plugin 설치
$ cd /opt/stackdriver/collectd/etc/collectd.d/ && sudo curl -O https://raw.githubusercontent.com/Stackdriver/stackdriver-agent-service-configs/master/etc/collectd.d/mongodb.conf
mongodb.conf 파일을 열어 STATS_USER, STATS_PASS 의 주석처리(“#”)을 지워주고, 앞에서 생성한 유저의 ID와 Password로 바꿔준다.
4.Stackdriver Agent 재시작
< Debian 8 >
$ sudo service stackdriver-agent restart
< CentOS 7 >
$ sudo systemctl restart stackdriver-agent
5.Monitoring 확인
Monitoring -> Resources -> Instances
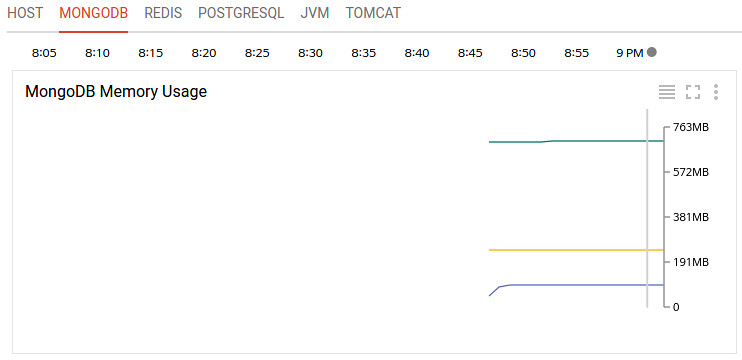
각 서버를 클릭해보자. stackdriver agent가 plugin이 정상으로 동작하여 정보를 제대로 가져온다면 Monitoring의 오른쪽 그래프 윗부분에서 다음과 같은 화면을 볼 수 있다.
[ 출처: Flickr, gongjak1 ]
6.현재 모니터링 가능한 항목
- Current Connections (count): The number of active connections to MongoDB.
- Global Lock Hold Time (ms): How long the global lock has been held.
- Mapped Memory (bytes): The amount of mapped memory used by MongoDB. This is roughly equivalent to the total size of your database, due to the use of memory mapped files.
- Virtual Memory (bytes): The amount of virtual memory used by MongoDB. If the virtual memory size is significantly larger than mapped memory size (e.g. 3 or more times), this may indicate a memory leak.
- Resident Memory (bytes): The amount of resident memory that is used by MongoDB. This is the amount of RAM being physically used by the database.
- Operations [command, delete, getmore, insert, query, update] (count/s): The number of [command, delete, getmore, insert, query, update] operations executed per second.
- Database [Collection, Index, Object, Extents] Count (count): The number of [collections, indices, objects, extents] currently in the database.
- Database Data Size (bytes): The size of the data currently in the database.
- Database Storage Size (bytes): The size of the storage currently allocated to the database.
- Database Index Size (bytes): The size of the index for the database.
MySQL Plugin
1.MySQL 설치와 시작
< Debian 8 >
$ sudo apt-get install mysql-server
< CentOS 7 >
$ wget http://repo.mysql.com/mysql-community-release-el7-5.noarch.rpm
$ sudo rpm -ivh mysql-community-release-el7-5.noarch.rpm
$ sudo yum update
$ sudo yum install mysql-server
$ sudo systemctl start mysqld
2.사전 준비
모니터링을 위해 DB 사용자를 추가해줘야 한다. ID와 Password는 반드시 수정해서 입력하길 바란다.
< CentOS 7 >
$ mysql -u root -p
< CentOS 7 >
$ mysql -u root

mysql> GRANT SELECT, SHOW DATABASES
ON *.*
TO 'stackdriver'@'localhost'
IDENTIFIED BY 'password';
3.Plugin 설치
$ cd /opt/stackdriver/collectd/etc/collectd.d/ && sudo curl -O https://raw.githubusercontent.com/Stackdriver/stackdriver-agent-service-configs/master/etc/collectd.d/mysql.conf
다은 받은 파일을 열어서 “STATS_USER”, “STATS_PASS” 를 모니터링을 위해 추가한 DB 사용자 정보로 바꿔준다.
4.Stackdriver Agent 재시작
< Debian 8 >
$ sudo service stackdriver-agent restart
< CentOS 7 >
$ sudo systemctl restart stackdriver-agent
5.Monitoring 확인
Monitoring -> Resources -> Instances
각 서버를 클릭해보자. stackdriver agent가 plugin이 정상으로 동작하여 정보를 제대로 가져온다면 Monitoring의 오른쪽 그래프 윗부분에서 다음과 같은 화면을 볼 수 있다.
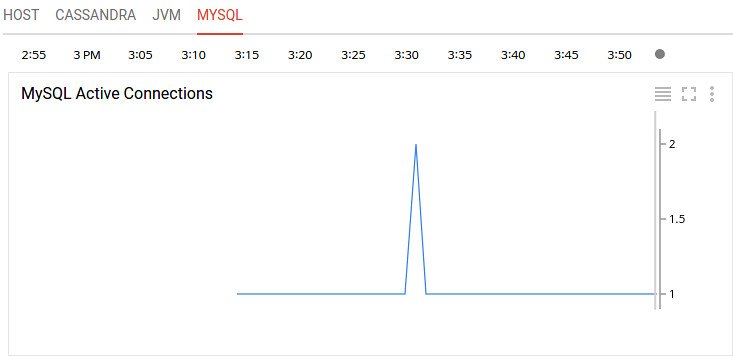
[ 출처: Flickr, gongjak1 ]
6.현재 모니터링 가능한 항목
- Connections (count): The number of active connections to MySQL.
- Select Queries (count): The number of select queries being run.
- Insert Queries (count): The number of insert queries being run.
- Update Queries (count): The number of update queries being run.
- Slave replication lag
Nginx Plugin
1.Nginx 설치와 시작
< Debian 8 >
$ sudo apt-get install nginx
< CentOS 7 >
$ sudo yum install epel-release
$ sudo yum install nginx
$ sudo systemctl start nginx
2.사전 준비
$ cd /etc/nginx/conf.d/ && sudo curl -O https://raw.githubusercontent.com/Stackdriver/stackdriver-agent-service-configs/master/etc/nginx/conf.d/status.conf
3.Plugin 설치
$ cd /opt/stackdriver/collectd/etc/collectd.d/ && sudo curl -O https://raw.githubusercontent.com/Stackdriver/stackdriver-agent-service-configs/master/etc/collectd.d/nginx.conf
4.Stackdriver Agent 재시작
< Debian 8 >
$ sudo service stackdriver-agent restart
< CentOS 7 >
$ sudo systemctl restart stackdriver-agent
5.Monitoring 확인
Monitoring -> Resources -> Instances
각 서버를 클릭해보자. stackdriver agent가 plugin이 정상으로 동작하여 정보를 제대로 가져온다면 Monitoring의 오른쪽 그래프 윗부분에서 다음과 같은 화면을 볼 수 있다.

[ 출처: Flickr, gongjak1 ]
6.현재 모니터링 가능한 항목
- Active Connections (count): The number of active connections currently attached to Nginx.
- Reading Connections (count): The number of reading connections currently attached to Nginx.
- Writing Connections (count): The number of writing connections currently attached to Nginx.
- Waiting Connections (count): The number of waiting connections currently attached to Nginx.
- Requests (count/s): The number of requests per second Nginx is servicing.
PostgreSQL Plugin
1.PostgreSQL 설치와 시작
< Debian 8 >
$ sudo apt-get install postgresql
< CentOS 7 >
$ sudo yum install postgresql-server postgresql-contrib
$ sudo postgresql-setup initdb
$ sudo systemctl start postgresql
2.사전 준비
모니터링을 위해 DB 사용자를 추가해줘야 한다. ID와 Password는 반드시 수정해서 입력하길 바란다.
$ sudo su - postgres
$ psql
postgres=# CREATE ROLE stackuser LOGIN PASSWORD ‘stack1234’ SUPERUSER;
postgres=# \q
pg_hba.conf 파일에 앞에 생성한 stackdriver 유저로 접근할 수 있도록 접근 권한을 줘야 한다. 다음 내용을 추가해준다.
< Debian 8 >
/etc/postgresql/9.4/main/pg_hba.conf
host all stackuser 127.0.0.1/32 md5
< CentOS 7 >
/var/lib/pgsql/data/pg_hba.conf
host all stackuser ::1/128 md5
host all stackuser 127.0.0.1/32 md5
postgresql 서버를 재기동 한 후, 잘 접속 되는지 확인해본다.
$ psql -U stackuser -W -h localhost -d postgres
3.Plugin 설치
$ cd /opt/stackdriver/collectd/etc/collectd.d/ && sudo curl -O https://raw.githubusercontent.com/Stackdriver/stackdriver-agent-service-configs/master/etc/collectd.d/postgresql.conf
postgresql.conf 파일을 열어서 다음 내용으로 수정해준다.
DATABASE_NAME ==> postgres
#Host "localhost" ==> Host "localhost"
STATS_USER ==> stackuser
STATS_PASS ==> stack1234
4.Stackdriver Agent 재시작
< Debian 8 >
$ sudo service stackdriver-agent restart
< CentOS 7 >
$ sudo systemctl restart stackdriver-agent
5.Monitoring 확인
Monitoring -> Resources -> Instances
각 서버를 클릭해보자. stackdriver agent가 plugin이 정상으로 동작하여 정보를 제대로 가져온다면 Monitoring의 오른쪽 그래프 윗부분에서 다음과 같은 화면을 볼 수 있다.
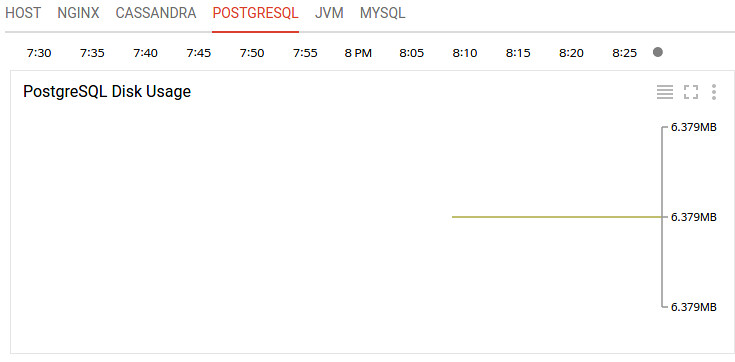
[ 출처: Flickr, gongjak1 ]
6.현재 모니터링 가능한 항목
- Connections (count): Number of connections to PostgreSQL.
- Disk Usage (byte): Number of bytes currently being used on disk.
- Commits (count/s): Number of commits per second.
- Rollbacks (count/s): Number of rollbacks per second.
- Heap Blocks Read Rate (count/s): Number of blocks read from the heap.
- Heap Cache Hit Rate (count/s): Number of blocks read directly out of the cache.
- Index Blocks Read Rate (count/s): Number of blocks read from the index.
- Index Cache Hit Rate (count/s): Number of index blocks read directly out of the cache.
- Toast Blocks Read Rate (count/s): Number of reads from the toast blocks.
- Toast Cache Hit Rate (count/s): Number of toast blocks read directly out of the cache.
- Toast Index Blocks Read Rate (count/s): Number of blocks read from the toast index.
- Toast Index Cache Hit Rate (count/s): Number of toast index blocks read directly out of the cache.
- Operations [delete, insert, update, heap only update] (count/s): Number of rows [deleted, inserted, updated, heap only updated] in the db.
- Dead Tuples (count): Number of tuples that are dead in the db.
- Live Tuples (count): Number of tuples that are live in the db.
Redis Plugin
1.Redis 설치와 시작
< Debian 8 >
$ sudo apt-get install redis-server
< CentOS 7 >
$ sudo yum install redis
$ sudo systemctl start redis
2.사전 준비
< Debian 8 >
$ sudo apt-get install libhiredis0.10
< CentOS 7 >
$ sudo yum install hiredis
3.Plugin 설치
$ cd /opt/stackdriver/collectd/etc/collectd.d/ && sudo curl -O https://raw.githubusercontent.com/Stackdriver/stackdriver-agent-service-configs/master/etc/collectd.d/redis.conf
4.Stackdriver Agent 재시작
< Debian 8 >
$ sudo service stackdriver-agent restart
< CentOS 7 >
$ sudo systemctl restart stackdriver-agent
5.Monitoring 확인
Monitoring -> Resources -> Instances
각 서버를 클릭해보자. stackdriver agent가 plugin이 정상으로 동작하여 정보를 제대로 가져온다면 Monitoring의 오른쪽 그래프 윗부분에서 다음과 같은 화면을 볼 수 있다.
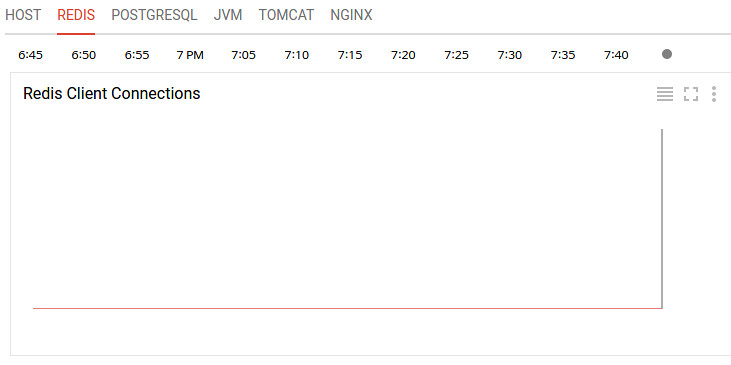
[ 출처: Flickr, gongjak1 ]
6.현재 모니터링 가능한 항목
- Client Connections (count): Number of clients connected to Redis.
- Slave Connections (count): Number of Redis slave connections to the master.
- Memory Usage (bytes): Amount of physical memory being used.
Tomcat Monitoring
1.Tomcat 설치와 시작
< Debian 8 >
$ sudo apt-get install tomcat7
< CentOS 7 >
$ sudo yum install tomcat
$ sudo systemctl start tomcat
2.사전 준비
JMX 모니터링을 사용하기 위해 catalina-jmx-remote.jar 파일을 설치해줘야 하는데, Debian 8 은 tomcat7을 설치하면 함께 설치가 되나 CentOS 7 은 직접 설치해줘야 한다.
< Debian 8 >
다음 내용으로 /usr/share/tomcat7/bin/setenv.sh 파일을 만든다.
$ sudo vi /usr/share/tomcat7/bin/setenv.sh
#!/bin/sh
JMX_OPTS=" -Dcom.sun.management.jmxremote \
-Dcom.sun.management.jmxremote.ssl=false \
-Dcom.sun.management.jmxremote.authenticate=false \
-Djava.rmi.server.hostname=localhost \
-Dcom.sun.management.jmxremote.ssl=false "
CATALINA_OPTS=" ${JMX_OPTS} ${CATALINA_OPTS}"
/etc/tomcat7/server.xml 파일을 열고 Server 항목에 다음 Listener를 추가한다.